Nested VMware ESXi with virtualbox - Your first nested-virtual-machine
Overview
Now that we've seen how to create a nested-ESXi on virtualbox, we may need to have some content in order to test commands of procedures.
Local datastore
Disk creation
To create a local datastore, you'll have to add a new virtual disk to your nested ESXi:
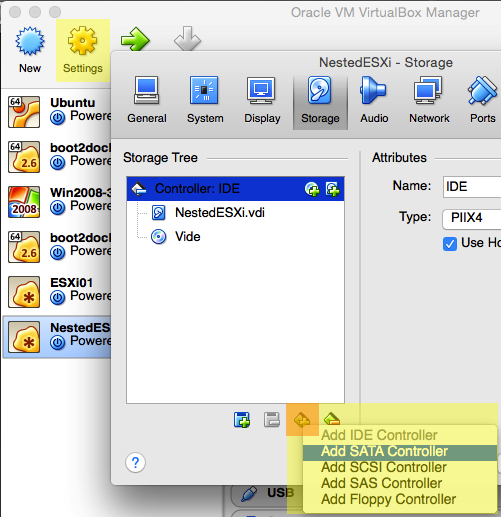
First step is to create a SATA disk controller:

Add a SATA controller
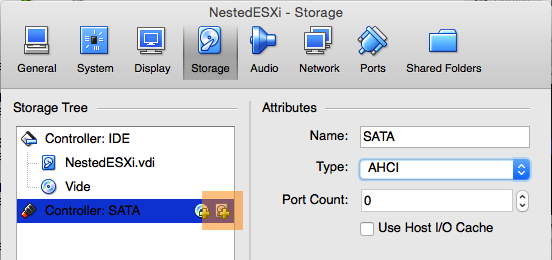
Next, create a new disk on the SATA controller:

Add a new disk
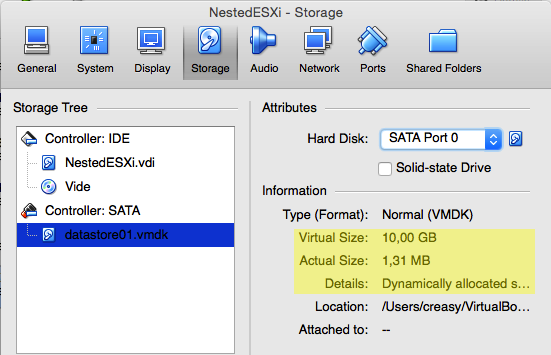
I've choose to set:
- vmdk file type
- 10GB
- Dynamic allocation

My additional disk settings
When the vdisk is connected, ESXi started, get it's name before creating a VMFS file system. Name should be something close to _/dev/disks/t10.ATA_____VBOX_HARDDISK___________________________VBxcxxxxxxxxxxxxxxx__
Here is a tip to only get un-partitionned disks locally connected to the ESXi:
$ fdisk -l | grep partition
Disk /dev/disks/t10.ATA_____VBOX_HARDDISK___________________________VB_VBxcxxxxxxxxxxxxxxx__ doesn't contain a valid partition table
Disk partition
When the new disk is located on the /dev/disks/, check the partition table:
$ partedUtil get /dev/disks/t10.ATA_____VBOX_HARDDISK___________________________VBbc7a87cf2D7739136a_
1305 255 63 20971520
This indicates that there is no partition on this disk and every sector is free space.
We also need the number of sector on the disk. This information is the last number of the previous command: 20971520 here.
Then we can create the first partition.
$ partedUtil set "/vmfs/devices/disks/t10.ATA_____VBOX_HARDDISK___________________________VBbc7a87cf2D7739136a_" "1 128 20971519 251 0"
0 0 0 0
1 128 20971519 251 0
In this example, we create a partition number 1, starting at sector 128 and ending at sector 20971519 (20971520-1), with type 251 = 0xFB.
And we can check the result:
$ partedUtil get /dev/disks/t10.ATA_____VBOX_HARDDISK___________________________VBbc7a87cf2D7739136a_
1305 255 63 20971520
1 128 20971519 251 0
Now we have a free partition ! And we can apply a vmfs5 file-system:
$ vmkfstools -C vmfs5 -b 1m -S LocalDatastore_001 /dev/disks/t10.ATA_____VBOX_HARDDISK___________________________VB_VBxcxxxxxxxxxxxxxxx__:1

create fs deviceName:'/dev/disks/t10.ATA_____VBOX_HARDDISK___________________________VB_VBxcxxxxxxxxxxxxxxx__:1', fsShortName:'vmfs5', fsName:'LocalDatastore_001'
deviceFullPath:/dev/disks/t10.ATA_____VBOX_HARDDISK___________________________VB_VBxcxxxxxxxxxxxxxxx__:1 deviceFile:t10.ATA_____VBOX_HARDDISK___________________________VB_VBxcxxxxxxxxxxxxxxx__:1
VMFS5 file system creation is deprecated on a BIOS/MBR partition on device 't10.ATA_____VBOX_HARDDISK___________________________VB_VBxcxxxxxxxxxxxxxxx__:1'
Checking if remote hosts are using this device as a valid file system. This may take a few seconds...
Creating vmfs5 file system on "t10.ATA_____VBOX_HARDDISK___________________________VB_VBxcxxxxxxxxxxxxxxx__:1" with blockSize 1048576 and volume label "LocalDatastore_001".
Successfully created new volume: 54d15e2c-eeeeeeee-9cff-080027b1c126
In this case, we create a vmfs5 datastore, with LocalDatastore_001 name and 1Mb block size.
And to check that datastore is ready:
$ esxcli storage filesystem list
Mount Point                                        Volume Name         UUID                                 Mounted  Type           Size        Free
-------------------------------------------------  ------------------  -----------------------------------  -------  ------  -----------  ----------
/vmfs/volumes/54d15e2c-eeeeeeee-9cff-080027b1c126  LocalDatastore_001  54d15e2c-eeeeeeee-9cff-080027b1c126     true  VMFS-5  10468982784  9545187328
We are now ready to create VM.
Dummy virtual machine
Sometimes, you may need to have empty, but working, virtual machines for testing. The following command create a dummy VM named TestVM and stored on the local datastore:
$ vim-cmd vmsvc/createdummyvm testVM [LocalDatastore_001]/testVM/testVM.vmx
1
Checking:
$ vim-cmd vmsvc/getallvms
Vmid    Name                     File                     Guest OS    Version   Annotation
1      testVM   [LocalDatastore_001] testVM/testVM.vmx   otherGuest   vmx-10
Houra !
Now we can play with this VM:
Starting the VM:
$ vim-cmd vmsvc/power.on 1
Powering on VM:
Get runtime informations about the running VM:
$ vim-cmd vmsvc/get.runtime 1
Runtime information
(vim.vm.RuntimeInfo) {
   dynamicType = <unset>,
   host = 'vim.HostSystem:ha-host',
   connectionState = "connected",
   powerState = "poweredOn",
   faultToleranceState = "notConfigured",
   dasVmProtection = (vim.vm.RuntimeInfo.DasProtectionState) null,
   toolsInstallerMounted = false,
   suspendTime = <unset>,
   bootTime = "2015-02-04T00:28:55.507435Z",
   suspendInterval = 0,
   question = (vim.vm.QuestionInfo) null,
   memoryOverhead = 36478976,
   maxCpuUsage = 2496,
   maxMemoryUsage = 32,
   numMksConnections = 0,
   recordReplayState = "inactive",
   cleanPowerOff = <unset>,
   needSecondaryReason = <unset>,
   onlineStandby = false,
   minRequiredEVCModeKey = <unset>,
   consolidationNeeded = false,
   featureRequirement = (vim.vm.FeatureRequirement) [
      (vim.vm.FeatureRequirement) {
         dynamicType = <unset>,
         key = "cpuid.SSE3",
         featureName = "cpuid.SSE3",
         value = "Bool:Min:1",
      },
      (vim.vm.FeatureRequirement) {
         dynamicType = <unset>,
         key = "cpuid.SSSE3",
         featureName = "cpuid.SSSE3",
         value = "Bool:Min:1",
      },
      (vim.vm.FeatureRequirement) {
         dynamicType = <unset>,
         key = "cpuid.NX",
         featureName = "cpuid.NX",
         value = "Bool:Min:1",
      },
      (vim.vm.FeatureRequirement) {
         dynamicType = <unset>,
         key = "cpuid.RDTSCP",
         featureName = "cpuid.RDTSCP",
         value = "Bool:Min:1",
      },
      (vim.vm.FeatureRequirement) {
         dynamicType = <unset>,
         key = "cpuid.Intel",
         featureName = "cpuid.Intel",
         value = "Bool:Min:1",
      }
   ],
   vFlashCacheAllocation = 0,
}
Power-off:
$ vim-cmd vmsvc/power.off 1
Powering off VM:
Get informations about the datastore location of VM:
$ vim-cmd vmsvc/get.datastores 1
name                 LocalDatastore_001
url                  /vmfs/volumes/54d15e2c-eeeeeeee-9cff-080027b1c126
capacity             10468982784
freeSpace            9544138752
accessible           1
type                 VMFS
multipleHostAccess   <unset>
Imported virtual machine
A dummy VM is usefull to test ESXi command line tools, but in some case you may want to test more complex VM settings. In that case, you can import an existing VM to your ESXi and run it.
Prerequisites
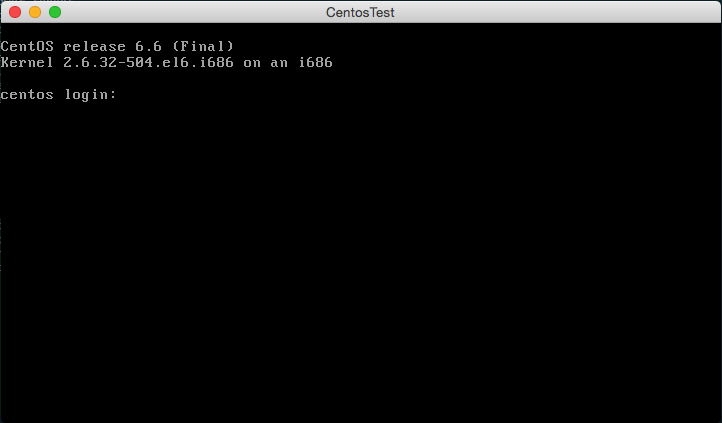
Create a virtual machine on virtual box with :
- SCSI/LsiLogic controller for main storage
- Bridged network connection (keep in mind the used mac address)
- Fixed IP settings
You'll also need the ovftools installed on your system: see instructions on VMware website
Export
To export a virtual machine on virtualbox you can use the File/Export menu or the following command line:
$ vboxmanage export CentosTest -o CentosTest.ova
0%...10%...
Next operation is to convert the .ova file to a .vmx one that can be used on ESXi:
$ ovftool --lax CentosTest.ova CentosTest.vmx
Opening OVA source: CentosTest.ova
Opening VMX target: CentosTest.vmx
Warning:
 - Line 25: Unsupported hardware family 'virtualbox-2.2'.
Writing VMX file: CentosTest.vmx
Transfer Completed
Warning:
 - No manifest entry found for: 'CentosTest-disk1.vmdk'.
 - No manifest file found.
Completed successfully
Now we have a .vmx and its .vmdk file:
$ du -ch *
976M    CentosTest-disk1.vmdk
402M    CentosTest.ova
12K     CentosTest.vmx
1,4G    total
Import
To import the vmx&vmdk file as a VM to our nested ESXi we also use the ovftool:
$ ovftool \
  --name="CentosTest" \
  -dm=thin -ds=LocalDatastore_001 \
  --net:"bridged"="VM Network" \
  CentosTest.vmx vi://root@192.168.1.16/
Opening VMX source: CentosTest.vmx
Enter login information for target vi://192.168.1.16/
Username: root
Password: *********
Opening VI target: vi://root@192.168.1.16:443/
Warning:
 - The specified operating system identifier '' (id: 79) is not supported on the selected host. It will be mapped to the following OS identifier: 'Other Linux (32-bit)'.
Deploying to VI: vi://root@192.168.1.16:443/
Transfer Completed
Completed successfully
This command will import the virtual machine on ESXi with following settings:
-dm=thin: force to use thin provisioning method for disk-ds=LocalDatastore_001: target datastore--net:"bridged"="VM Network": Map the bridged network to theVM Networkone on ESXi
We can check the import from the ESXi shell:
$ vim-cmd vmsvc/getallvms
Vmid      Name                           File                           Guest OS       Version   Annotation
2      CentosTest   [LocalDatastore_001] CentosTest/CentosTest.vmx   otherLinuxGuest   vmx-10
Enable network from nested-VM
To keep the mac address you already set in virtualBox:
$ sed -i "s/ethernet0\.addressType \= \"generated\"/ethernet0\.addressType \= \"static\"/g" /vmfs/volumes/LocalDatastore_001/CentosTest/CentosTest.vmx
echo "ethernet0.address=\"08:00:27:47:76:67\"" >> /vmfs/volumes/LocalDatastore_001/CentosTest/CentosTest.vmx
If you powerOn the VM now, you'll not be able to join it on the network from another computer than the nested ESXi. This limitation is link to the nested ESXi VM configuration. You'll need to enable "promiscuous mode" on the ESXi VM. By command line:
$ vboxmanage controlvm NestedESXi nicpromisc1 allow-all
With a poweredOn VM On ESXi you should now be able to join the LAN or to join nested VM from LAN too.
Add VNC support to VM
If you want to be able to get a view or access to virtual machine, you have to setup VNC access on VM and on ESXi firewall.
VM setup for VNC
First step is to edit the VM vmx file to add some informations (VM needs to be powered-off):
$ echo "RemoteDisplay.vnc.enabled = \"true\"
RemoteDisplay.vnc.port = \"5800\"
RemoteDisplay.vnc.password = \"125678\" \
RemoteDisplay.vnc.keymap = \"fr\"" >> /vmfs/volumes/LocalDatastore_001/CentosTest/CentosTest.vmx
Now we reload VM config file :
$ vim-cmd vmsvc/reload 2
You can start/stop/do-everything-you-want on your newly imported VM !
Firewall configuration for VNC
We create a folder on our Datastore to store the FW configuration files:
$ mkdir /vmfs/volumes/LocalDatastore_001/firewall/
And we create our first firewall custom script:
$ echo "<!-- Custom firewall configuration information -->
<ConfigRoot>
  <!-- VNC -->
  <service id='0038'>
    <id>VNC</id>
    <rule id='0000'>
      <direction>inbound</direction>
      <protocol>tcp</protocol>
      <porttype>dst</porttype>
      <port>
        <begin>5800</begin>
        <end>5999</end>
      </port>
    </rule>
    <enabled>true</enabled>
    <required>false</required>
  </service>
</ConfigRoot>" > /vmfs/volumes/LocalDatastore_001/VPNtoVM.xml
This will create a new set of rules and rules for opening TCP ports 5800 to 5999 for VNC usage.
Then we test our configuration file:
$ cp /vmfs/volumes/LocalDatastore_001/firewall/*.xml /etc/vmware/firewall/
$ esxcli network firewall refresh
$ esxcli network firewall ruleset list | grep VNC
VNC                    true
$ esxcli network firewall ruleset rule list | grep VNC
VNC                 Inbound    TCP       Dst              1234      1234
It seems OK but if you reboot the ESXi, these changes will be lost. In order to keep them working, we use the /etc/rc.local.d/local.sh script to copy and refresh rules on starting process:
$ echo "$(cat /etc/rc.local.d/local.sh | grep -v exit)

# Copy custom firewall configurations
cp /vmfs/volumes/LocalDatastore_001/firewall/*.xml /etc/vmware/firewall/
esxcli network firewall refresh

exit 0" > /etc/rc.local.d/local.sh
And if you need to be more restrictive about the authorized IP address:
$ esxcli network firewall ruleset set --allowed-all false --ruleset-id=VNC
$ esxcli network firewall ruleset allowedip add --ip-address=192.168.1.0/24 --ruleset-id=VNC
... to only accept IP address from a subnet to access to VNC features.
And you just need a VNC client software to access to your VM console with following settings:
- server IP : ip of your nested ESXi
- server port : port you choose for VNC settings on the VM
- password : VNC password on VM settings
