VMware Event Broker 0.5.0 (aka VEBA) on Kubernetes – First steps
Overview
This post is a re-edition of a previous one: VMware Event Broker (aka VEBA) on Kubernetes – First steps, update to be applicable to the new 0.5.0 release of VEBA, including the support of
helmchart deployment.
In the following post, we will (re)discover how to deploy the VMware Event Broker services (VEBA) within an existing Kubernetes (K8S) cluster and use it to add/edit custom attributes information to virtual machines.
The goal of the VEBA deployment is to be able to listen for events in the VMware vCenter infrastructure and to run specific tasks when filtered events occurs: it is the event driven automation concept.
To be accurate, VEBA stands for "VMware Event Broker Appliance": a Photon OS based virtual machine, available in OVA format, with an embedded small K8S cluster to support the "VMware Event Broker" services. In the following post, I re-use an existing K8S cluster to support the "VMware Event Broker" services but I will use the VEBA acronym to simplify the redaction: even if I do not use the appliance deployment method.
If you need more details about VEB(A), the official website if well documented: vmweventbroker.io and lot of other use-cases are listed: notification, automation, integration, remediation, audit, analytics…
VMware Event Broker components
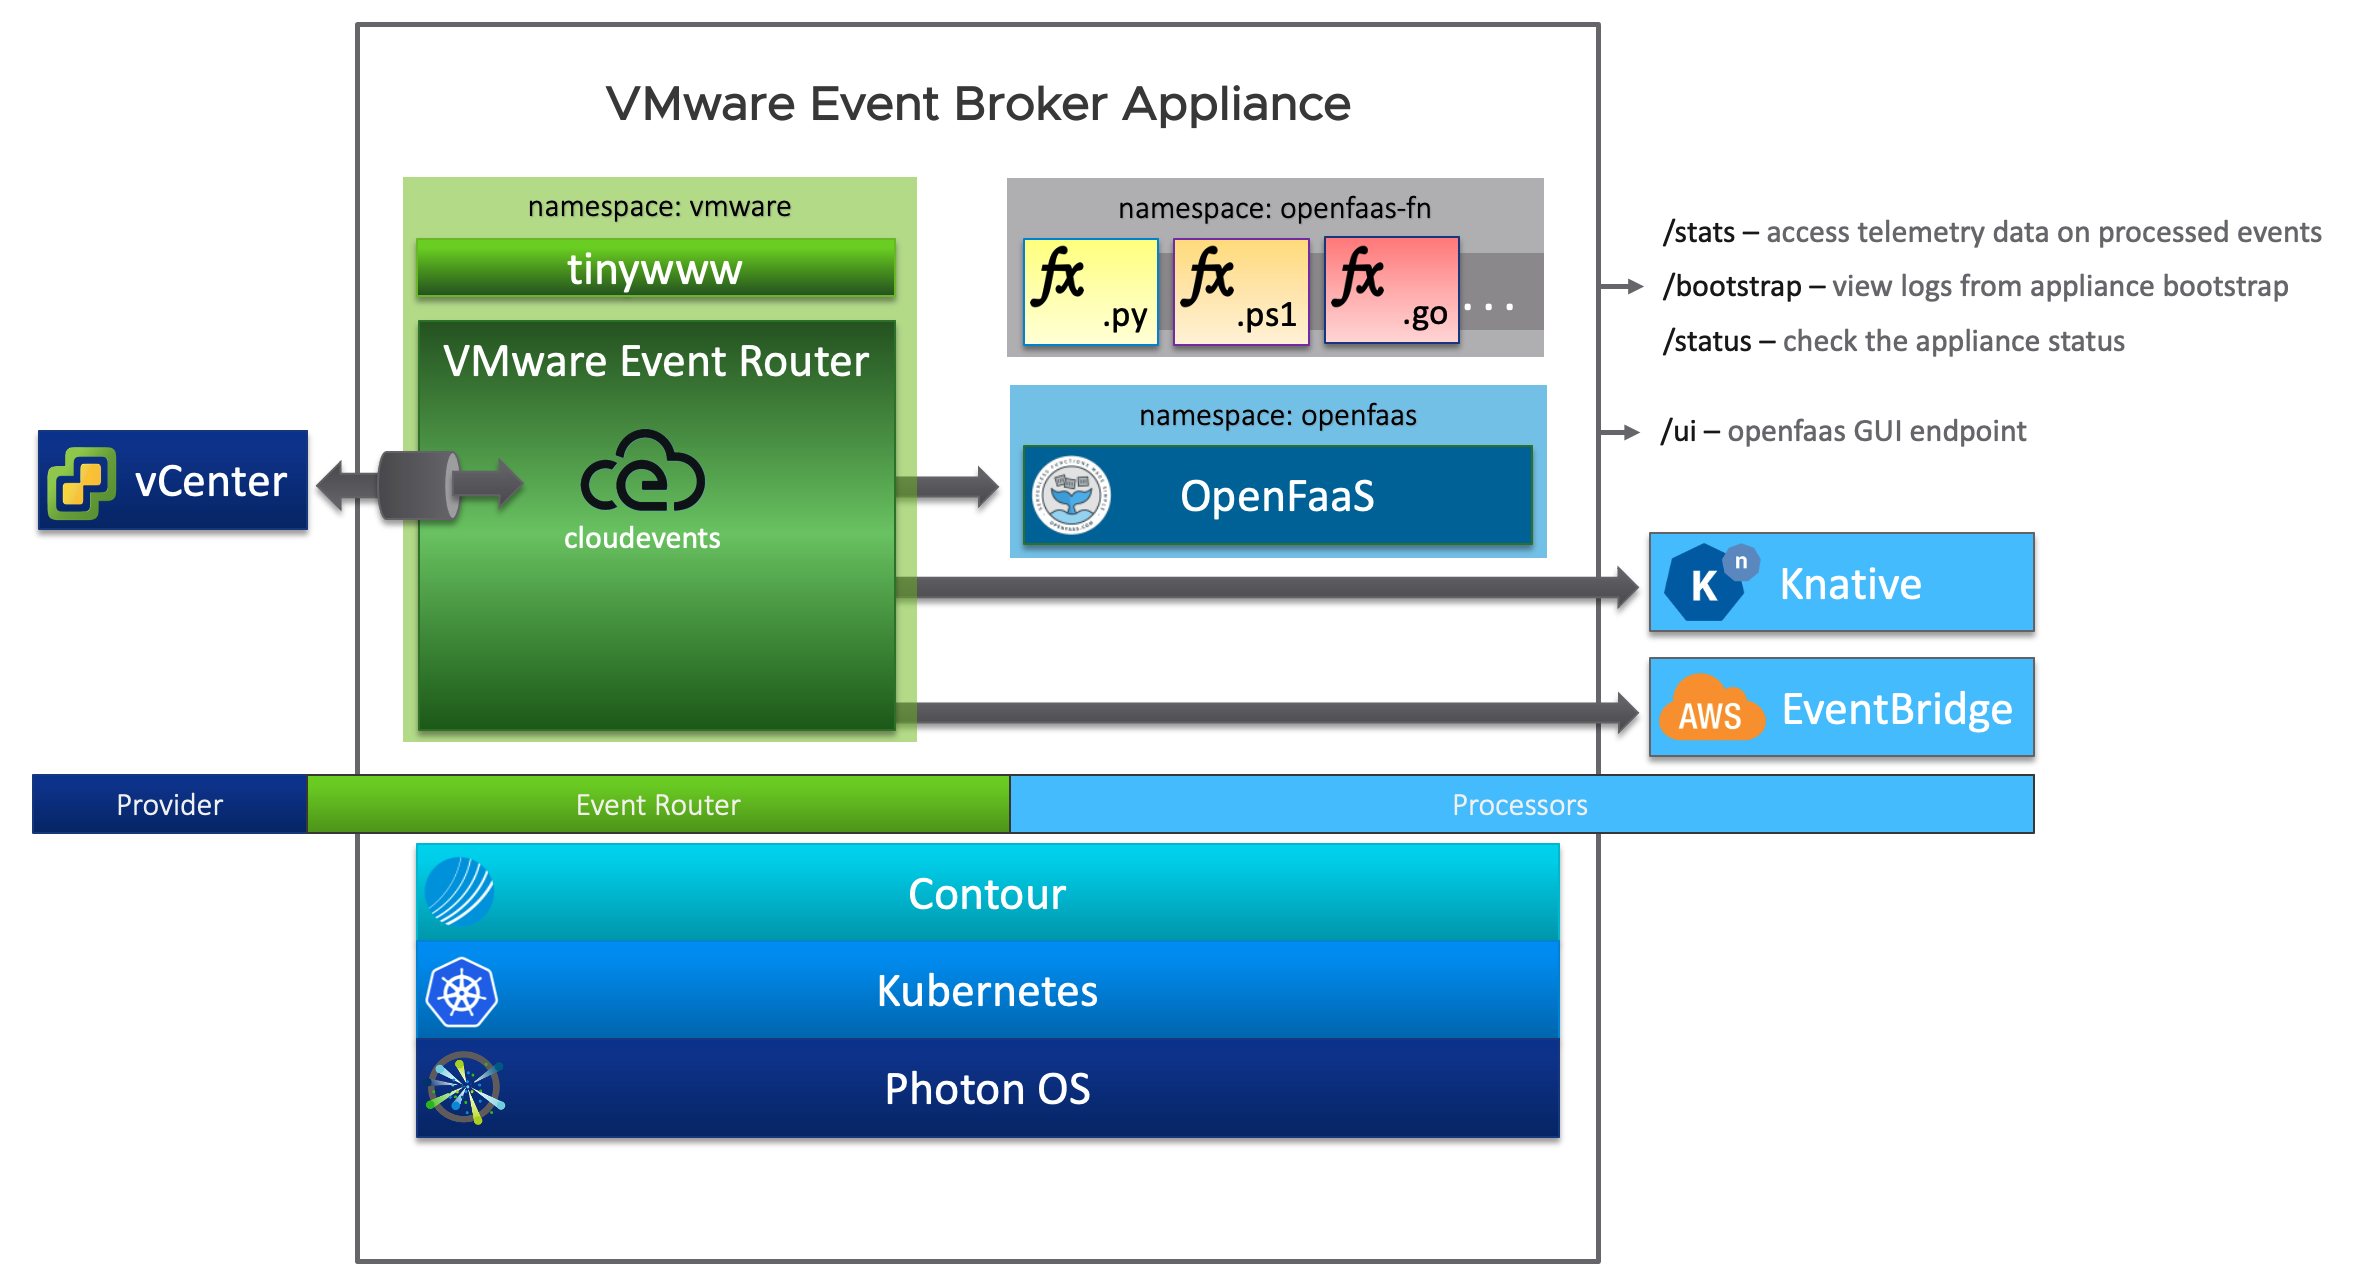
VEBA Architecture
VMware Event Router
The VMware Event Router, is the VEBA component, watching for new events generated by an Event Stream Source and routing the event to the Event Stream Processors. In the mean time, the VER translate the events to the cloudevents format: a specification for describing event data in a common way.
Event Stream Source
Currently, the VEBA only support one source for event stream: the vCenter Server.
As announced at VMworld2020 (VEBA and the Power of Event-Driven Automation – Reloaded [HCP1358]), a Cloud Director event stream source is in preparation.
Event Stream Processors
The Event Stream Processor is in charge of handling the event propagated by the VMware Event Router to the appropriate automation tasks that are configured to run for the specific type of event.
As the time I write this post, 3 processors are available:
- Amazon EventBridge: to run on AWS serverless event services, your automation tasks.
- OpenFaaS®: An open-source project to run Function as a Service (FaaS) automation task over a K8S deployment.
- KNative NEW in 0.5.0: a Google-sponsored industry-wide project to extends Kubernetes to provide developers with a set of tools that simplify the process of deploying and managing event-driven applications that can run anywhere.
In my setup, I use the OpenFaaS processor.
Pre-requisites
Kubernetes
To proceed, we consider that an existing cluster is deployed.
If you need to deploy a really light and simple lab setup, I can highly recommend to use k3s to deploy your own K8S cluster: K3S: Quick-Start Guide.
In my own lab, I use a K8S cluster deployed by Rancher with the vSphere node driver (but that doesn't change anything to the current use-case).
kubectl cli
kubectl is the standard CLI tool to operate K8S resources.
Once installed, you need to link your K8S cluster configuration file. There are multiple methods to do so, so I prefer to link the official documentation for Organizing Cluster Access Using kubeconfig Files.
You can check the setup by running:
1# Display the current configuration
2kubectl config view
3
4# Get client and server version
5kubectl version --short
The last command should output something close to this:
1Client Version: v1.19.3
2Server Version: v1.19.2
helm cli
The helm cli will provide a simple way to deploy both OpenFaaS and VEBA stacks:
1curl https://raw.githubusercontent.com/helm/helm/master/scripts/get-helm-3 | sudo bash
faas-cli
The faas-cli requirement is linked to the usage of the OpenFaaS processor in the following setup.
Here is one installation method:
1curl -sSL https://cli.openfaas.com | sudo sh
You can also use an alternative installation method described in the
faas-cliproject GitHub repository.
OpenFaaS deployment
1kubectl create ns openfaas
2kubectl create ns openfaas-fn
3helm repo add openfaas https://openfaas.github.io/faas-netes
4helm repo update
5helm upgrade openfaas --install openfaas/openfaas \
6  --namespace openfaas \
7  --set functionNamespace=openfaas-fn \
8  --set generateBasicAuth=true
You can check the deployment status by running:
1kubectl -n openfaas get deployments -l "release=openfaas, app=openfaas"
Once deployed, you can get the generated password and the endpoint URL by:
1# Get password
2export OF_PASS=$(echo $(kubectl -n openfaas get secret basic-auth -o jsonpath="{.data.basic-auth-password}" | base64 --decode))
3echo $OF_PASS
4
5# Get URI
6echo "export OPENFAAS_URL=http://"$(kubectl -n openfaas describe pods $(kubectl -n openfaas get pods | grep "gateway-" | awk '{print $1}') | grep "^Node:" | awk -F "/" '{print $2}')":31112"
Ingress access to OpenFaaS
If you want to access with a friendly URI to your OpenFaaS instance, you can use an ingress like the following one:
- Create a DNS record for your new openfaas fqdn then
- Create the following file:
1mkdir openfaas
2vi openfaas/ingress.yml
 1apiVersion: networking.k8s.io/v1beta1
 2kind: Ingress
 3metadata:
 4  name: openfaas-gateway-ingress
 5  namespace: openfaas
 6  annotations:
 7    kubernetes.io/ingress.class: traefik
 8spec:
 9  rules:
10  - host: openfaas.vlab.lcl
11    http:
12      paths:
13      - backend:
14          serviceName: gateway
15          servicePort: 8080
Deploy it:
1kubectl apply -f ingress.yml
2kubectl get ingress -n openfaas
3echo "export OPENFAAS_URL=http://$(kubectl get ingress -n openfaas 2>/dev/null| grep "gateway-" | awk '{print $3}')"
Check the deployment
If you requested the OpenFaaS deployment, you now have a set of pods in the openfaas namespace:
 1kubectl get pods -n openfaas
 2# You should get a new set of running pods
 3NAME                                READY   STATUS    RESTARTS   AGE
 4basic-auth-plugin-bc899c574-6hzhf   1/1     Running   0          18h
 5nats-7d86c64647-nj9mm               1/1     Running   0          18h
 6queue-worker-5d8986f858-cql9c       1/1     Running   1          18h
 7alertmanager-677f4db47f-s92xs       1/1     Running   0          18h
 8prometheus-7797994d65-74pvn         1/1     Running   0          18h
 9gateway-7f6d9cb855-xptmw            2/2     Running   0          18h
10faas-idler-7f66c658bf-gs98m         1/1     Running   3          18h
Login to your OpenFaaS cli and UI
Login to faas-cli
We now need to get the OpenFaaS URI to use the faas-cli client:
1echo $OF_PASS | faas-cli login --password-stdin
A warning will recommend you to use an HTTPS endpoint instead of the HTTP one: let's ignore it for the moment.
At least, you should get a message like: "credentials saved for admin http://openfaas.vlab.lcl" meaning that you successfully configured your faas-cli client.
Login to the UI
Use the same URL to login with the admin account to the web UI and you should get something like that:
Empty OpenFaaS UI
VEBA deployment on Kubernetes
The VEBA deployment on K8S is quite simple and does not require a lot of configuration.
Prepare an override file
Prepare an override.yml file to provide to veba its deployment settings:
1mkdir veba
2vim veba/override.yml
 1eventrouter:
 2  config:
 3    logLevel: debug
 4  vcenter:
 5    address: https://vcsa.vlab.lcl
 6    username: administrator@vsphere.local
 7    password: ---------
 8    insecure: false # ignore TLS certs ?
 9  openfaas:
10    address: http://openfaas.vlab.lcl
11    basicAuth: true
12    username: admin
13    password: ---------
Deploy VEBA to your Kubernetes cluster
VEBA team provides a helm chart to handle the deployment:
1helm repo add vmware-veba https://projects.registry.vmware.com/chartrepo/veba
2helm repo update
3helm install -n vc-veba --create-namespace vc-veba vmware-veba/event-router -f veba/override.yml
4kubectl -n vc-veba logs deploy/router -f
You should get logs from the startup of the envent router pod.
Check the deployment
Few minutes later, you should have a new VEBA deployment:
1kubectl -n vc-veba get deployments
2# You should get a ready router
3NAME     READY   UP-TO-DATE   AVAILABLE   AGE
4router   1/1     1            1           18h
5
6kubectl get pods -n vc-veba
7# You should get a running pod
8NAME                                   READY   STATUS    RESTARTS   AGE
9vmware-event-router-859b97c894-bxx94   1/1     Running   0          25m
This pod, in the vmware is the VMware Event Router as explained previously in this post.
First function
Time to describe our first function use case:
We have a lab vCenter with multiple users, multiple projects, PoC etc. And it's a bit hard to know which VM belongs to which user, and if the project is still active.
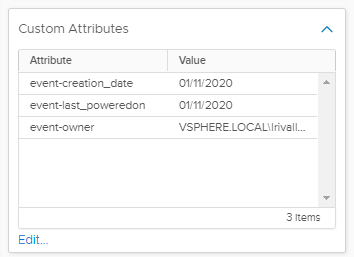
A way I found to handle this, is to set Custom Attributes to the VM objects in vCenter, and to populate values when specific event occurs:
event-creation_date: To store the creation dateevent-last_poweredon: To store the last powered on dateevent-owner: To store the user that created the VM
Custom attributes created for this function
Function files/folders structure
An VEBA OpenFaaS function is made of the following items:
handler/: this folder will store the content of our function code (folder name can be personalized)stack.yaml: This file will describe our function- A config file, passed as a K8S secret to our function, used to store credentials and other environment specific variables. In my example, it's a YAML file:
vcconfig.yml.
To simplify this post, I invite you to clone this sample repository:
1git clone https://github.com/lrivallain/veba-sample-custom-attribute.git
2cd veba-sample-custom-attribute/
stack.yaml file
This description file is used by VEBA to create the function run on our function-processor.
 1version: 1.0
 2provider:
 3  name: openfaas
 4  gateway: http://openfaas.vlab.lcl
 5functions:
 6  vm-creation-attr:
 7    namespace: openfaas-fn
 8    lang: python3
 9    handler: ./handler
10    image: lrivallain/veba-vc-vm-creation-attr
11    environment:
12      write_debug: true
13      read_debug: true
14    secrets:
15      - vcconfig
16    annotations:
17      topic: VmCreatedEvent, VmClonedEvent, VmRegisteredEvent, DrsVmPoweredOnEvent, VmPoweredOnEvent, VmPoweringOnWithCustomizedDVPortEvent
As you see, we specify here the:
- OpenFaaS URI gateway (the one in
OPENFAAS_URL) - The target namespace:
openfaas-fn - A language type:
python3 - The function folder:
./handler - A base image to run the function:
lrivallain/veba-vc-vm-creation-attr- This image contains the appropriate dependencies to run our function
- The configuration as a K8S secret name.
- And in the annotations: the topic(s) to subscribe for this function.
- Depending on your vCenter version, you can find an Event list in the vcenter-event-mapping repository of William Lam.
handler/ folder
The handler folder is made of:
- An
index.pyfile, use to handle the function instantiation: keep it like it is provided to start: of course, you can inspect the content to analyse the (simple) behaviour. - A
function/subfolder:- The
handler.pyfile contains the code run each time the function is triggered - The
requirements.txtfile contains some function specific dependencies.
- The
- The
Dockerfileused to build the base image:lrivallain/veba-vc-vm-creation-attr:Docker Cloud Build Status

vcconfig.yaml
This is a quite simple configuration file to rename to the expected name:
1cp vcconfig.example.yaml vcconfig.yaml
 1vcenter:
 2  server: vcsa-fqdn
 3  user: service-account@vsphere.local
 4  password: "**********"
 5  ssl_verify: false
 6
 7attributes:
 8  owner: event-owner
 9  creation_date: event-creation_date
10  last_poweredon: event-last_poweredon
You need to setup your VCSA instance, credentials and the name of custom attributes to use for each need.
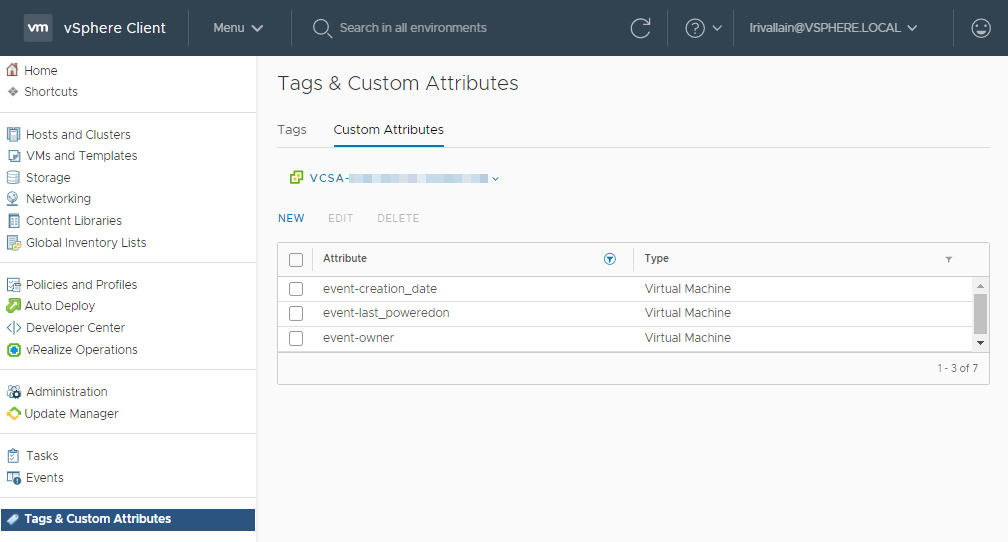
Custom attributes creation
The script currently does not handle the custom attribute creation so you need to create them before using the function:
Custom attributes
Deploy our function
We now got function code, configuration, and the VEBA over K8S deployed. Let's deploy our function.
First step is to create the "secret" to store our local configuration:
1faas-cli secret create vcconfig --from-file=vcconfig.yml
And to confirm if it worked, we can lookup for the vcconfig secret in a new namespace named: openfaas-fn (for OpenFaaS Function)
1kubectl get secrets -n openfaas-fn vcconfig
2# Output:
3NAME       TYPE     DATA   AGE
4vcconfig   Opaque   1      2m53s
Now we need to pull the OpenFaaS language template for the specified lang in our stack.yml file:
1faas template store pull python3
In fact, this command will pull all (12) the languages templates from the
openfaasregistry, not only the one you are looking for.
We are ready to deploy our Function-as-a-Service:
1faas-cli deploy -f stack.yml
2# Output
3Deploying: vm-creation-attr.
4Deployed. 202 Accepted.
5URL: http://openfaas.vlab.lcl/function/vm-creation-attr.openfaas-fn
We can check that a new pod is now part of the openfaas-fn namespace:
1$ kubectl get pods -n openfaas-fn
2# Output:
3NAME                                READY   STATUS    RESTARTS   AGE
4vm-creation-attr-65d9f75464-lf2sk   1/1     Running   0          94s
And our function is well listed in faas-cli
1faas-cli list
2# Output:
3Function                        Invocations     Replicas
4vm-creation-attr                0               1
The same in UI (need a refresh):
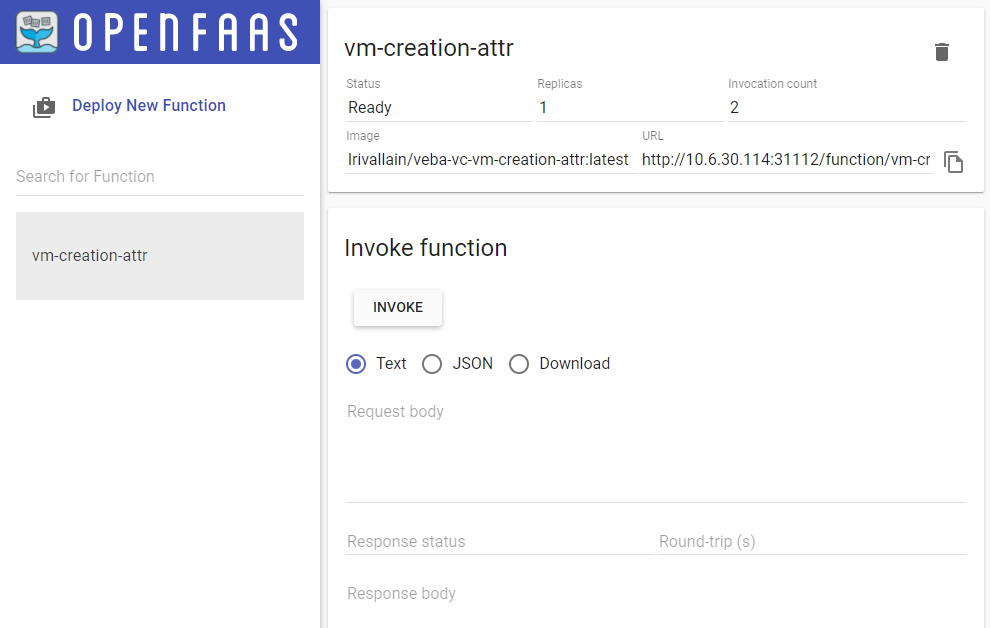
First Function deployed in the OpenFaaS UI
Invoke function
Invocation is now easy: juste create or power-on a VM in your vCenter and the event will be catched by VEBA, forwared to your OpenFaaS function and the code will run, inspecting the cloudevents incoming data and doint the expected tasks.
Follow function invocation
There is two way to follow the function invocation(s).
By using kubectl logs and specifing the openfaas-fn namespace, the pod name (from above commands), and the --tail and/or --follow args:
1kubectl logs -n openfaas-fn vm-creation-attr-65d9f75464-lf2sk --tail 100 --follow
2# Output:
32020/11/01 14:41:26 Version: 0.18.1     SHA: b46be5a4d9d9d55da9c4b1e50d86346e0afccf2d
42020/11/01 14:41:26 Timeouts: read: 5s, write: 5s hard: 0s.
52020/11/01 14:41:26 Listening on port: 8080
62020/11/01 14:41:26 Writing lock-file to: /tmp/.lock
72020/11/01 14:41:26 Metrics listening on port: 8081
Or with faas-cli command:
1faas-cli logs vm-creation-attr --tail 100
2# Output:
32020-11-01T14:41:26Z 2020/11/01 14:41:26 Version: 0.18.1        SHA: b46be5a4d9d9d55da9c4b1e50d86346e0afccf2d
42020-11-01T14:41:26Z 2020/11/01 14:41:26 Timeouts: read: 5s, write: 5s hard: 0s.
52020-11-01T14:41:26Z 2020/11/01 14:41:26 Listening on port: 8080
62020-11-01T14:41:26Z 2020/11/01 14:41:26 Writing lock-file to: /tmp/.lock
72020-11-01T14:41:26Z 2020/11/01 14:41:26 Metrics listening on port: 8081
Both outputs are very similar, so you can use the one that is the more convenient to you.
VM creation
In the case of a VM creation, we have the following output:

Logs for the VM creation event
And the attributes are populated according to the expected behavior:
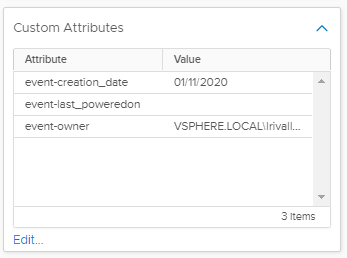
Attributes for the VM creation event
VM powered-On
If we power On a VM:

Logs for the VM poweredOn event
And the attributes are populated according to the expected behavior:
Attributes for the VM poweredOn event
Conclusion
We successfully covered the deployment of our first Event-Driven Function-as-a-Service use-case, greatly helped by the VMware Event Broker services.
There is a multitude of events you can subscribe in your VMware virtual datacenter to imagine an infinity list of use cases: it is time to unlock your creativity!